Server Setup
Suggested Server Setup
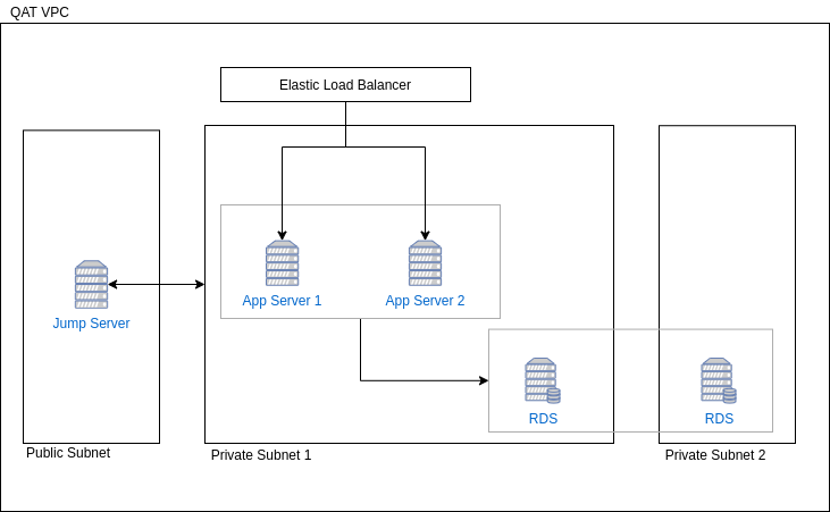
The below diagram explains the setup that is the suggested setup for the QAT application. The current set up is with Amazon Web Services (AWS) . For access to the login for this, please contact Support@quantificationanalytics.org.

Figure 2: Relational Database Service (RDS) and Virtual Private Cloud (VPC)
This is the suggested setup the user can choose to downgrade this as per requirements. On a minimum level ,the following components are required
a. Load balancer or WebServer
b. Application Server
c. Database Server
This section needs to be updated as the versions are outdated.
You can refer to the installation guides for fasp-api and fasp-core-ui for more information on up to date versions for some of the dependencies.
Operating system requirements
Application Server: The Application server requires a Linux based server preferably Ubuntu with at least ver 18.04LTS or higher.
Database Server: The Database server needs MySql v 5.7
Other Software
Application Server:
-
Java JDK ver 11
sudo apt-get install openjdk-11-jdk-headless -
Apache WebServer
sudo apt-get install apache2 -
Node JS version 8.10
sudo apt-get install nodejs -
PM2 A production process manager for Node.js applications with a built-in load balancer. It allows you to keep applications alive forever, to reload them without downtime and to facilitate common system admin tasks.
sudo npm install -g pm2
Setup process
Application Server
Apache server
To setup Apache server use the following commands
sudo apt-get install apache2
Copy the SSL Certificates into a folder called /etc/apache2/ssl/
Create a file called www.quantificationanalytics.org.conf in the following folder /etc/apache2/sites-available/ with the following contents:
<VirtualHost *:80>
    ServerName quantificationanalytics.org
    ServerAlias www.quantificationanalytics.org
    ServerAdmin info@altius.cc
    ErrorLog /var/log/apache2/qat_error.log

    # Possible values include: debug, info, notice, warn, error, crit, alert, emerg.
    LogLevel warn
    CustomLog /var/log/apache2/qat_access.log combined

    RewriteEngine On
    RewriteRule (.*) https://%{HTTP_HOST}%{REQUEST_URI}
</VirtualHost>

<VirtualHost *:443>
    ServerName quantificationanalytics.org
    ServerAlias www.quantificationanalytics.org
    ServerAdmin info@altius.cc

    ErrorLog /var/log/apache2/qat_error.log

    # Possible values include: debug, info, notice, warn, error, crit, alert, emerg.
    LogLevel warn
    CustomLog /var/log/apache2/qat_access.log combined

    ProxyRequests Off
    ProxyPreserveHost On
    ProxyPass / http://localhost:4202/

    SSLEngine On
    SSLCertificateFile /etc/apache2/ssl/WWW.QUANTIFICATIONANALYTICS.ORG.crt
    SSLCertificateKeyFile /etc/apache2/ssl/www.quantificationanalytics.org.txt
    SetEnvIf User-Agent ".*MSIE.*" nokeepalive ssl-unclean-shutdown

    Header always set Strict-Transport-Security "max-age=63072000;"
    Header always unset X-Frame-Options
    Header set X-Frame-Options "SAMEORIGIN"
    Header always set X-Content-Type-Options nosniff
    Header set Feature-Policy: "fullscreen 'self'"
    Header set Referrer-Policy: "no-referrer"
</VirtualHost>
Create a file called api.quantificationanalytics.org.conf in the following folder /etc/apache2/sites-available/ with the following contents
<VirtualHost *:80>
    ServerAlias api.quantificationanalytics.org
    ServerAdmin info@altius.cc

    ErrorLog /var/log/apache2/qatapi_error.log

    # Possible values include: debug, info, notice, warn, error, crit, alert, emerg.
    LogLevel warn
    CustomLog /var/log/apache2/qatapi_access.log combined

    RewriteEngine On
    RewriteRule (.*) https://%{HTTP_HOST}%{REQUEST_URI}
</VirtualHost>

<VirtualHost *:443>
    ServerAlias api.quantificationanalytics.org
    ServerAdmin info@altius.cc

    ErrorLog /var/log/apache2/qatapi_error.log

    # Possible values include: debug, info, notice, warn, error, crit, alert, emerg.
    LogLevel warn
    CustomLog /var/log/apache2/qatapi_access.log combined

    ProxyRequests Off
    ProxyPreserveHost On
    ProxyPass / ajp://localhost:8109/

    SSLEngine On
    SSLCertificateFile /etc/apache2/ssl/API.QUANTIFICATIONANALYTICS.ORG.crt
    SSLCertificateKeyFile /etc/apache2/ssl/api.quantificationanalytics.org.txt
    SSLCertificateChainFile /etc/apache2/ssl/DV_USERTrustRSACertificationAuthority.crt

    SetEnvIf User-Agent ".*MSIE.*" nokeepalive ssl-unclean-shutdown
</VirtualHost>
To enable the modules required for Apache to work execute the following:
sudo a2enmod proxy proxy_ajp proxy_http rewrite ssl
To enable the sites you need to run the following command:
sudo a2ensite www.quantificationanalytics.org.conf
sudo a2ensite api.quantificationanalytics.org.conf
To restart the apache2 service and activate your new settings run the following command:
sudo systemctl restart apache2.service
Node JS
Run the following command to install Node JS:
curl \-sL https://deb.nodesource.com/setup\_12.x | sudo \-E bash \-
Run the following command to install Node JS:
sudo apt-get install \-y nodejs
Run the following command to update npm to the latest version:
sudo npm install npm@latest \-g
PM2
Add instructions for installing PM2
API Application
To Install the application and run it on the Server download the compiled QAT.war file on to the Server /home/ubuntu/qatApi folder
Make sure the QAT.war file is executable
Create a service file in the /etc/systemd/system/QATAPI.service with the following content:
[Unit]
Description=QAT API

[Service]
User=nobody
# The configuration file application.properties should be here:
WorkingDirectory=/home/ubuntu/qatApi
ExecStart=/usr/bin/java -Xmx256m -jar QATAPI.jar
SuccessExitStatus=143
# TimeoutStopSec=10
# Restart=on-failure
# RestartSec=5

[Install]
WantedBy=multi-user.target
Make sure that service file has 755 rights
sudo chmod 755 /etc/systemd/system/QATAPI.service
Reload the daemon services
sudo systemctl daemon-reload
You can now use the following commands to start, stop or restart the application
To start the application
sudo systemctl start QATAPI.service
To stop the application
sudo systemctl stop QATAPI.service
To check the status of the application
sudo systemctl status QATAPI.service
To restart the application
sudo systemctl restart QATAPI.service